Thursday, December 30, 2010

Champagne Truffles

Making these new year's eve treats couldn't be easier! Seriously. As I'm typing this, mine are sitting in the freezer as we speak, firming up and getting ready to be rolled in delicious almond-y goodness.


The only things you have to really pay attention to are the toasting of the almonds (if you're planning on toasting them yourself, which I highly recommend) and boiling the heavy cream. With the former, it's probably obvious why you'd have to pay attention... no one wants to eat burnt almonds. And the cream, it can easily boil over in just a matter of seconds after reaching its boiling point, so you just want to make sure you don't get distracted and walk away while it's heating up, especially since it's such a small amount of liquid.


The Ingredients:
-1/2 cup heavy cream
-8 oz bittersweet chocolate. If you're using chocolate chips you can leave them as they are, but if you're using a bar, chop them up to make it easier to melt.
-1/4 cup champagne
-toasted almonds, chopped


The Directions:
1. Bring the heavy cream to a boil in a small saucepan, then immediately pour over the chocolate.
2. Stir until everything is smooth.
3. Stir in the champagne. The mixture gets really thin after everything is incorporated but everything will thicken once it's been in the freezer.
4. Freeze mixture until the chocolate is firm enough to form into balls.
5. In the meantime, if you're toasting your own almonds, spread them out onto a cookie sheet (don't chop them up until after you've toasted them or else all of their oils will evaporate in the oven) and put them in an oven that's been preheated to 400 degrees Fahrenheit for about 5 minutes. Allow them to cool and then chop them up.
6. Scoop chocolate into balls with either a melon baller, a small ice cream scooper, or a teaspoon and place the balls onto a cookie sheet lined with parchment paper. But work fast because the chocolate can quickly soften again (I used a teaspoon and it gave me about 25 truffles.) Place them back into the freezer to firm up again.
7. Roll truffles in the chopped almonds, transfer back to baking sheet, cover with saran wrap and refrigerate for at least another half hour. These can be made in advance and stored in the refrigerator for up to three days.
8. Consume and enjoy with your leftover champagne!

Unfortunately, I over-toasted my almonds so they're more brown than golden-brown.
Ideas: If nut toppings aren't your cup of tea, you can always roll your truffles in something else! The most popular one would probably be to roll them in cocoa powder but you can also roll them in sprinkles, candy bits, coconut... you can even dip the truffles into melted chocolate. The possibilities are endless!

Monday, December 27, 2010

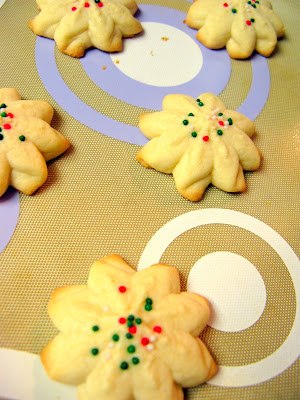
Spritz Cookies


I used to make these every year a couple days before winter break for friends and they were always a hit but I haven't made these for quite some time now. It's actually been so long (okay, not really, maybe four years) that I had forgotten about some of the problems I had when I first started baking them. So long story short, the problems and I had a little reunion...


I meant for this to be a "holiday" post and was hoping to have all this blogging business done before Christmas but unfortunately, my schedule was more hectic than I had anticipated and I ended up having to bake close to 400 cookies. I swear, every time I have to bake for the holidays or something, I say to myself "NEVER AGAIN!" but lo and behold, I always find myself back where I was: in the kitchen, 4 am, with the mixer mixing and the oven ovening.


Anyway, hope you all had a great holiday and have a happy new year!

The Ingredients:
-1 cup butter, softened
-2 cups powdered sugar
-2 egg yolks
-2 tsp almond extract
-1/2 tsp vanilla extract
-2 3/4 cups flour
-1/4 tsp salt

The Directions:
1. Preheat oven to 400 degrees Fahrenheit.
2. Sift the flour and salt together, set aside.
3. Cream butter and sugar until light and fluffy.
Reminder: scrape between each ingredient addition! And don't forget to scrape up the stuff from the bottom of the bowl!
4. Beat in the yolks and extracts.
5. Stir in sifted ingredients, in increments, or else you'll be covered in flour.
6. Option #1: Roll dough into balls, dip the bottom of a clean glass in flour and flatten cookie.
Option #2: Using either a cookie press or a piping bag, pipe out cookies onto a baking sheet. 
7. Bake until golden brown on the bottom, about 10 minutes, but I strongly recommend checking on them a few minutes in because they might be barely colored one minute, and then burned the next. And if you find that your cookie bottoms are burning faster than the rest of it is cooking, you can try the tip I mentioned in this post
8. Consume and enjoy!
Tips: These cookies are really buttery so if you're using a cookie press, I would recommend lining your cookie sheets with aluminum foil (shiny side up) instead of a silicon mat or you might have a bit of trouble with getting the dough to stick to the mat and un-attaching from the press, like I did. You might even have to change the foil after a few batches. Also, if you find that your dough is a little too sticky (if you poke the dough, it shouldn't stick to your fingers at all) you can add a little more flour. I add in only a tsp at a time and test it before adding more so I don't dry out the cookie.

Ideas: You can top the cookies with sprinkles, such as nonpareils, before you bake them or even color the dough. You can even use this dough for thumb print cookies! I like to top each cookie with a little bit of raspberry preserves and bittersweet chocolate (mmm...)

Wednesday, December 15, 2010

Blueberry Coffee-Cake-Ish Cake

This blueberry coffee-cake-ish cake (I say -ish because I'm not an expert on pastry classification) is a sweet-but-not-too-sweet, moist cake. It's delicious with coffee and tea or even on its own as a snack.


My finished product is a little darker than what I wanted and what I usually end up with but that was entirely my fault. I used a different pan than I would normally use, which made the batter spread out thinner, so I forgot that it'd take less time to finish baking. The inside should be more of a golden-yellow color, not brown like mine.


*Special thanks to my friend,Thao, for taking all the pictures featured in this post. All two hundred of them that I had to look at and filter out.*


The Ingredients:
For the cake:
-1 cup butter, softened
-1 tbsp vegetable oil
-1/2 cup packed brown sugar
-1/2 cup granulated sugar
-3 eggs
-2 cups flour
-1 tbsp baking soda
-1 tsp salt
-1 cup milk
-1/2 cup blueberries, tossed in 1 tsp flour (if you're using frozen, keep in the freezer until needed or the berries could stain your cake)
For the topping:
-1/2 cup blueberries
-1/4 cup granulated sugar
-1/2 tsp ground cinnamon


The Directions:
1. Preheat your oven to 350 degrees Fahrenheit.
2. Cream butter and sugars. Scrape down the sides and bottom of the bowl and the paddle.
3. Sift together the flour, salt and baking soda.
4. Add the oil and eggs one at a time to the butter/sugar mixture, beating each one until just incorporated, and scraping the bowl and paddle after each.
5. Reduce speed and add in 1/3 of the dry mixture (no need for formalities, just eyeball it.) Scrape.
6. Making sure to scrape and mix well between each addition, add 1/2 the milk, then another 1/3 of the dry, the rest of the milk, and finally the rest of the dry ingredients.
7. Fold in the blueberries that have been tossed in flour.
8. Pour batter into a baking pan that has been greased and dusted with flour. Use a spatula to spread and even out the batter.
9. Mix the sugar and cinnamon together.
10. Sprinkle the second 1/2 cup of blueberries over the top of the batter, then follow with the cinnamon sugar.
11. Bake for about 45 to 50 minutes. It's best to check on it about 20 minutes in to rotate as well as to check how far along it's baked so far, that way, you can better judge how much more time is needed.
12. Consume and enjoy!

Tuesday, December 7, 2010

Chocolate Chip Crisps

This recipe is pretty straight forward and the same techniques that were used in my oatmeal cookies were used here. I know, I know, another "repeat" recipe but I promise, my next post will be different!


Although, this post is a bit different, in a sense. Because people have requested it, I will start posting step by step pictures instead of just the finished product for all you visual learners out there. Let me know what you think about doing the blog this way :)


FYI: all the pictures are of what the ingredients should look like after each step.


The Ingredients:
-1/2 cup butter, softened
-1 cup sugar
-1 egg
-1 tsp vanilla extract
-1 1/4 cups flour
-1/2 tsp baking soda
-a pinch of salt
-2 cups rice crispies cereal
-1 cup chocolate chips


The Directions:
1. Preheat the oven to 350 degrees Fahrenheit.
Muy importante that the oven's preheated before baking!
2. Cream the butter and sugar.
Make sure to scrape the sides, the bottom and the paddle before the next step!
3. Beat in the egg and vanilla.
Scrape scrape scrape!
4. Mix flour, salt, and baking soda together.
I didn't sift my ingredients together, but you can if you want. A little sifting never hurt anyone.
5. Add the dry to the wet in two intervals, scraping in between.
What your dough should look like after adding the dry ingredients.
6. Fold in the cereal and chocolate chips gently to avoid breaking the cereal too much.
Before adding to the dough
After
7. Bake until golden brown,about 10 to 12 minutes. Halfway through baking, I like to turn the baking sheets around in the oven since there could be uneven hot spots in the oven. That way, every cookie bakes in the same amount of time and in the same amount of heat, if that makes sense.
Tip: if you find that the bottoms of your cookies keep burning or baking faster than the rest of the cookie, you can put one or two empty baking sheets on the next rack down. That way, the sheets can help shield some of the heat from getting to the bottom of your cookies. Don't put it in until after you've preheated the oven though or it'll take longer to preheat.
Don't you love my purple mat?
8. Enjoy!
Ian R., Dept. of Quality Control